During the last few years many fishing magazines have had numerous high-tech articles on float fishing. But while recently thinking about putting some material together for my upcoming fishing schools, one of my golden rules came to mind, “don’t assume anything about what you think anglers know–start with the absolute basics and go from there”.
During my early years or teaching classes I might have thrown around words or phrases like dressing a jig, using a Lindy Rig, backtrolling, structure fishing and so on, thinking everybody knew what I was talking about. But I learned that some neophytes didn’t have a clue what some of those terms meant. The same logic struck me while doing a recent float article–maybe we got into the high-tech before we covered the basics. So with that in mind lets start out on the ground floor.
HOW SLIP FLOATS WORK
Your fishing line slides through a hole in a float (inserted from the top down) until an obstacle such as a knot and/or bead stops its progress. The knot/bead is placed a predetermined distance from your bait or lure to allow you to fish at a precise level, regardless of how deep it is. If I were to hold the hook or jig in my right hand and slide the slip knot (bobber stop) to the tip of my nose, I measure off a distance of precisely two-and-a-half feet. Setting a slip bobber’s depth at ten feet would be four similar measurements or pulls. Fractions of a complete pull can easily be “eyeballed” to give you a little less depth.
The knot or float stop is put on your line first and is always above the float (closer to the reel). There are numerous float stops on the market, from small rubber football-shaped stops to Dacron line tied into a nail knot around a hollow , thin tube. Some hold tight and effortlessly slide on and off your reel–others don’t. I haven’t tried all the stops on the market but the ones I’ve found best are the Thill float stops. They are not made of thick line that easily slides, but of an ultra-thin braided line that clamps down on your line like a vice.
Enterprising anglers can make their own float stops. A good trick is to tie several nail knots with dental floss on a thin hollow tube such as a coffee or drink-stirring straw. When it comes time to rig up a slip float, put your fishing line trough the straw, slide one of the knots onto your line and move it to the desired depth level then pull the tag ends to tighten the knot and trim it as closely as possible to eliminate any line-catching “ears”.
If the slip knot slides through or hangs up in the hole in the float, then a small bead is needed between the knot and float. If the hole through the float is large, which is often a benefit because line (especially thicker diameter line) can more easily pass through it, then a bead larger than the hole in the float must be used as a buffer between the knot and float.
When fishing waters deeper than 4-5 feet, most float fishermen
use slip-floats. They are also good for flipping into tight spots.
WEIGHTING METHODS
Slip floats are usually fished with live bait or a lure such as a jig or spoon, or often with a live bait-lure combination. Live bait is generally used below split-shot to help “balance” the float. Balancing is using enough weight to make the float stand upright in the water-ideally with most of the float submerged so a fish feels as little resistance a possible (due to decreased buoyancy) when it takes your offering.
Weight placement can be very important. The farther the shot is placed from the hook the slower the bait will fall. Sometimes a slow, natural drop speed is best because your bait lingers at various depth levels longer. This gives a fish that commonly suspends, such as a crappie or trout, more time to look at your offering.
Floats that are pre-weighted and balanced by having a lead band around their base can be tossed great distances. A tiny shot is often used above the hook to keep the float from sliding all the way down to the bait and tearing it. These slip floats are excellent for giving shore-bound anglers extra casting range.
Shot evenly spaced on the line creates the minimum amount of splash and is the shotting pattern that’s least likely to wrap around itself during a cast. Most line-tangling problems can be eliminated by “feathering” the line during the cast. This is simply slowing the lines momentum down just before it hits the water. This is usually accomplished by lightly touching the spool of an open face spinning reel just before the bait or lure splashes down.
When shot are bunched together it’s called bulking the shot. The further bulked shot is away from the bait, the slower and more naturally the bait falls. But sometimes you may want a bait to quickly get to a certain depth level, so you bulk the shot up closer to the hook. This is generally a desirable tactic to get a bait deep fast, to bypass smaller suspended fish or to give you more control over deep snags.

A jig adds bulk, color and action to your presentation. My favorite jig for use below a float for crappie or walleye is a marabou-tailed Lindy Fuzz-E-Grub. Swirl-type tails need more action to activate them, while even the gentlest current or wave action causes a marabou tail to wave seductively in the water. In colder water a minnow is often added to the jig for crappies or walleyes, while in warmer weather a leech is tough to beat for walleyes or bass.
BASIC WALLEYE/BASS DESIGNS
When I first started using slip floats for walleyes and bass, wider-bodied, oval-shaped floats with short stems coming off the top and bottom were generally the style used. They could be pulled under by a fish pretty easy, were fairly visible and were less effected by wind drift than the old traditional red and white, hollow-bodied, snap-on, plastic bobbers. I would still consider using this style float for more aggressive fish.
Floats with wider bodies react more to wave and wind action than slimmer-bodied floats. So if I wanted my bait or lure to exhibit the most up and down action, or to drift across a section of bottom in the least amount of time, a wider float would be chosen.
When using an “action float”, a jig or small thin single-hooked flutter spoon such as Bait Rigs Tackle Company’s Willospoon (P.O. Box 44153, Madison, WI 53744) is often used with live bait such as a minnow or leech. If any additional split shot is needed, it’s attached fairly close to the lure. I don’t want the energies of wave and wind to just jig the weights several feet from the lure–this action is meant to be put on your presentation.
Two styles of floats maybe used at the same time until the fish show a preference for a more, or less active presentation. While one float may be drifting and bouncing across a sunken weed bed or rock pile, the other float may present a bait with much less drift speed and vertical action.
The long-stemmed “bodied waggler” style float is capable of presenting a bait with minimal up and down motion and little, if any, drift speed. This style float is the most sensitive to bites, and by using the various styles you can fish depths up to about 30-feet. Sizes 7 and 8 Thill bodied wagglers would generally be used for moderate depths, smaller baits and fairly calm water, while the bigger sizes (10 and 13) are recommended for larger baits, more weight, greater depths and bigger waves.
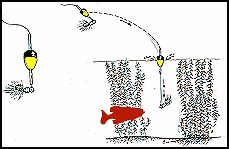
Just about all anglers have been frustrated at one time or another by our “bobber” being blown back to us or to the side while we were trying to cast with a second rod. Did you even think of why the wind will blow a bobber out of control? This happens because of two reasons–you’re using a fat, buoyant bobber that the wind can move, and much of your line is above the surface where the wind can get at it. To counteract the wind to keep your bait exactly where you want it, use a slim-profile, waggler-style float, then “bury your line” under the surface. Burying your line means casting at least 10 feet past the spot you want to fish, then put your rod tip under the surface and reel fast until the float is directly over the targeted area. When you stop reeling the float will slowly rise to the surface and remain in position because the sunken line is completely out of the wind and under the surface drift.
Center slider are an excellent all-around slip float. They come in a variety of styles from two to six inches in length . Thill Tackle, a division of Lindy-Little Joe (P.O. Box C, Brainerd, MN 56401) has just introduced an extra long center slider called the “Mille Lacs Special” especially designed for big wind-swept waters. A center slider’s slim profile cuts the wind pretty good and fish can easily pull it under. Besides its “all-around” design, this is the best float to use when vertical jigging with a slip float. Longer rods (7 foot or more) and upward lifts are recommended for jigging and more effective hook-sets with this style of float. Setting the hook with a sideways sweep puts too much drag on the float and cuts into your hooking power.
BASIC PANFISH DESIGNS
There are five basic designs of slip floats that I commonly use for panfish, and they are all “Thill floats” made by Lindy. An excellent multi-use is called the Ice ‘n Fly Special. It can be used as a fixed float (non-sliding), a strike indicator when fly fishing, a “pilot float” when used above a float stop to show the direction a fish is running with your bait or as a slip float.
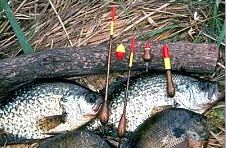
Left to right: stealth, mini-stealth, bodied waggler, Ice n’ Fly, Bodied waggler.
Taller floats are preferred for longer casts or wavier water.
This small oval-shaped slip-float easily slides through weeds, brush, limbs or overhanging grassy banks. I favor it when vertical fishing or making short accurate casts into tough to fish spots. A small jig or ice fishing spoon baited with a pinhead minnow or grub completes this deadly panfish package.
The pear-shaped Mini-Stealth float comes in 6 sizes and will “balance” with weights from 1/64 to 1/8-ounce. A correctly balanced float will have just the red (or chartreuse) tip of this float above the surface, making it very easy for a light biting fish to pull under. This is an excellent slip float to use in shallow to medium depth waters under calmer conditions. If long casts are needed or if there is a good chop on the surface, this small float would be difficult to see. Under those conditions a long-stemmed waggler float would be a better choice.
A Stealth float can be 4 to 5-inches long, while waggler-style floats would generally be from 6 1/2 to 13 inches in length. Stealth floats would balance with weights from about 1/16 to a little over 1/4 ounce ounce. The buoyancy of this relatively short float makes it ideal when wanting to make longer casts in shallower water (5 feet or less). The slim profile cuts through the wind and helps you achieve a more natural, stable bait presentation under windier conditions. The line can easily be buried under the surface with this float to minimize drifting in the wind.
Slim-bodied waggler floats are very buoyant, allowing you to use more shot to balance it. More weight is needed to make longer casts and/or to fish deeper waters. The long slim shape of this float make it very easy for a fish to pull it under the surface. Both Wagglers and the Bodied Wagglers are recommended when fishing water over 5-feet deep, when maximum length casts are needed, and when float visibility is an issue under wavier conditions. These floats are not used in shallower, clear water because their long profile might scare a panfish that has pulled the float under.

Don’t be afraid to use a float that’s ten to thirteen inches long for panfish. The amount of wood shown is neutralized by the weight put on the line. While a big waggler-style float may support up to nearly 3/8 ounce of weight, just a thin sliver of wood a couple of inches long is all that’s pulled under the surface. Much less resistance is needed to pull a properly balance waggler under the surface, than is required to submerge an old fashioned red and white snap-on bobber that’s only an inch in diameter.
I hope this information helps you understand the use of modern slip-floats. I know all the shapes and styles can be confusing.


